


A tie can change your whole look in just a few seconds. It can make a simple shirt look smart, a suit look more polished, and your overall style look more confident. Many people think tying a tie is difficult, especially if they have never done it before. At first glance, all those folds and loops can look confusing. But once you understand the basic process, it becomes surprisingly easy. With some practice, it becomes as easy as anything else.
The guide is explained in straightforward English so anyone can follow along.It explains how to tie a tie step by step, how to tie a tie easy for beginners, how to tie a tie quickly when you are in a hurry, and different ways to tie a tie for different occasions. The goal is not just to teach a knot. The goal is to help you feel comfortable wearing a tie without stress or confusion.
Why Learning to Tie a Tie Still Matters
Even in a casual world, ties still have an important place. People wear them for interviews, weddings, business meetings, school events, formal dinners, and special occasions. A well-tied tie shows care, attention, and confidence. It tells people that you took time to dress properly.
Some people only wear a tie once in a while, so they forget tie it by the next event. Others have never learned at all and feel nervous when they need one. That is completely normal. The good news is that learning this skill is much easier than most people think. Once you learn one basic knot, the rest becomes much simpler.
A tie is also one of those small clothing items that can make a big difference. A shirt without a tie may look fine, but the same shirt with a nice knot can suddenly look sharp and complete. That is why learning this skill is useful for students, professionals, and anyone who wants to look well dressed.
Before You Start: Get the Tie Ready Properly
Before you begin, it helps to make sure the tie is the right length and that you are standing in front of a mirror. A mirror makes the process much easier because you can see what you are doing and fix mistakes quickly. Your shirt collar should already be up, and the top button should be fastened.
The thick, leading portion of a tie is known as its wide end. The narrow end is the thinner side. Most knots are tied by moving the wide end around the narrow end. For most people, the wide end should start lower than the narrow end. How much lower depends on your height and the knot you are using. If you are taller, you may need a little more length.
The final tie should end around the middle of your belt buckle. It’s the most practical and popular length choice. If the tie is too short, it looks awkward. If it is too long, it can look sloppy. A neat tie always helps the full outfit look better.
How to Tie a Tie Step by Step Using the Four-in-Hand Knot
The Four-in-Hand knot is one of the easiest and most popular knots in the world. It is a great choice for beginners because it is simple, fast, and works with many shirt collars. It has a slightly narrow shape, which gives a clean and modern look.
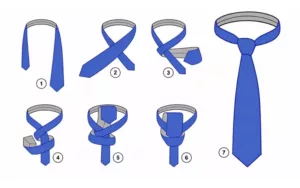
Start by placing the tie around your neck with the wide end on your right side and the narrow end on your left side. Let the wide side of the tie hang lower than the thin side. Cross the wide end over the narrow end. Then take the wide end behind the narrow end and bring it across the front again.
Now pull the wide end upward through the space near your collar. After that, bring it down through the front loop you have made. Hold the narrow end gently while you slide the knot upward toward your collar. Tighten it slowly and make sure it sits straight in the center.
The beauty of this knot is that it does not need perfect symmetry to look good. Even if it is a little uneven, it still looks stylish. That is one reason people often search for how to tie a tie easy and end up choosing this knot first.
How to Tie a Tie for Beginners Without Stress
If you are learning for the first time, do not try to rush. The biggest mistake beginners make is pulling too quickly or trying to force the fabric into place. A tie works better when you move slowly and keep the fabric smooth.
One useful method is to practice the motion without fully tightening the knot at first. This helps you understand the direction of the wide end and how the knot forms. After a few tries, your hands will remember the steps more easily. That is how most people learn any practical skill: not by getting it perfect on the first try, but by repeating it calmly.
Another helpful tip is to use a tie made from a material that is not too slippery. Very smooth ties can slide around a lot, which makes them harder for beginners. A tie with a little texture is often easier to control. Also, make sure your shirt collar is not twisted or folded wrongly, because that can make the whole knot look uneven.
Ai Generated Image
A beginner should focus on three things only: the right length, a smooth knot, and a neat center position. Once those three things are in place, the tie will already look good, even if it is not perfect.
How to Tie a Tie Quickly When You Are in a Hurry
Sometimes there is no time to practice. You may be getting ready for a meeting, a wedding, a school function, or an interview and realize you need the tie on fast. In that case, the best approach is to use a knot you already know well. The Four-in-Hand is still one of the best choices because it is fast and simple.
The key to tying a tie quickly is not to think too much about it. Move in a smooth rhythm. Keep the wide end in control and avoid stopping in the middle. The more you practice the knot, the faster you will get. What feels slow the first few times can become automatic later.
If you are really short on time, it helps to keep your tie already selected and ready before you start dressing. That way you are not wasting time searching for it. A pre-set tie in the right length can save a surprising amount of time.
Quick tying is also about confidence. People often make it harder than it needs to be because they worry about every tiny detail. The truth is that a clean, simple knot tied fast is usually better than a messy knot tied slowly.
Different Ways to Tie a Tie for Different Looks
Learning different ways to tie a tie gives you more control over your style. Not every knot looks the same, and not every knot suits every shirt collar. Some knots are slim and simple. Others are larger and more formal. Choosing the right one depends on the event, your outfit, and the image you want to present.
The Half Windsor is a very popular choice. It is slightly larger and more balanced than the Four-in-Hand. It works well for many people because it looks neat and professional without being too bulky. It is a smart option for office wear, interviews, and formal but not overly dressy events.
The Full Windsor is bigger and more formal. It creates a strong triangular shape and works well with wide collar shirts. This knot is a good choice for weddings, important presentations, and other occasions where you want to look especially polished. It does take a little more practice, but once learned, it can look very impressive.
The Pratt knot is another useful option. It is neat, medium in size, and works well for many kinds of shirts. Some people like it because it looks clean without feeling too complicated.
Bow ties are different from regular neckties, but they are also part of the same style world. A bow tie can look elegant, bold, and even playful depending on the event. It is often worn at formal dinners, black-tie events, or special celebrations.
Different ways to tie a tie are useful because not every outfit needs the same knot. The right knot can make your shirt collar and suit look much better together.
How to Choose the Right Knot for the Occasion
A tie is not only about the knot itself. It is also about matching the knot to the situation. For a job interview, a simple and neat knot usually works best because it gives a clean professional look. For a wedding, you may want something fuller and more elegant. For daily office wear, something balanced and easy is often the safest choice.
If your shirt has a narrow collar, a smaller knot often looks better. If your collar is wide, a larger knot can fill the space more naturally. This balance matters more than many people realize. A good knot should fit the shirt, not fight against it.
Color also plays a role. A dark tie with a formal shirt often looks strong and serious. A lighter or patterned tie can feel more relaxed or creative. Still, the knot itself should remain neat, no matter what color you choose.
Think of the tie as part of the whole outfit, not as a separate item. The shirt, collar, suit, and tie should all work together. When that happens, the final look feels smooth and intentional.
Common Mistakes People Make When Tying a Tie
Many tie problems are easy to avoid once you know what to watch for. One common mistake is making the knot too loose. A loose knot can look careless and may drop down too far from the collar. Another common mistake is making it too tight, which can make the tie look stiff and uncomfortable.
Another issue is incorrect length. If the tie hangs too high, it looks unfinished. If it goes too low, it can look untidy. The ideal ending point is around the middle of the belt buckle. That one detail can improve the whole look instantly.
Twisting the fabric is another mistake. A tie should lie flat and smooth unless the knot style naturally creates a textured look. If the fabric gets twisted during tying, pause and straighten it before tightening the knot fully.
Many forget to align the knot properly in the center. A tie that sits slightly off-center can make even a good outfit look unbalanced. Taking a few seconds to adjust the knot properly is always worth it.
How to Make Your Tie Look Better and More Stylish
Once you know the basics, a few small habits can make your tie look much better. Start by smoothing the fabric with your hands after the knot is complete. This helps remove folds and keeps the knot neat. Then check the length in the mirror and make small adjustments if needed.
The tie should also match the shirt and suit in a balanced way. A very wide tie with a very slim shirt collar can look awkward. A slim tie with a very formal wide collar may also feel mismatched. Style is often about balance, not just color or brand.
You can also pay attention to the dimple, which is the small fold just below the knot. A soft dimple can make the tie look more refined. It is not required, but many people like it because it adds character and shape. It is a small detail, but small details often make the biggest difference in dressing well.
The condition of the tie matters too. A wrinkled or damaged tie will never look as good as a smooth one. Keep your tie clean, store it properly, and untie it after wearing it. That helps the fabric last longer and keeps it looking fresh.
A Few Easy Practice Tips That Really Help
Practice makes the whole process feel natural. One of the best ways to learn is to tie the same knot several times in a row without worrying about perfection. After a few attempts, your hands begin to remember the pattern. That makes future dressing much easier.
Another good habit is to practice before the day you actually need the tie. If you wait until the morning of an important event, the pressure can make the process feel harder. Practicing on a quiet day removes the stress and gives you more confidence.
You can also watch your hands in the mirror and notice where the fabric moves. This helps you understand the shape of the knot instead of just copying the motion blindly. Once you understand the shape, you can repeat it more easily.
For many people, the hardest part is simply starting. Once you begin, the steps are not as hard as they seemed. A tie looks complicated from far away, but in real life it is only a sequence of simple moves.
Final Thoughts
Learning how to tie a tie is one of those small life skills that can make a big difference. It helps you look more polished, feel more confident, and dress properly for important occasions. The best part is that it does not require special equipment or advanced knowledge. You only need a tie, a mirror, a little patience, and a few minutes of practice.
For beginners, the Four-in-Hand knot is usually the easiest place to start. It teaches the basic movement and gives you a clean, classic look. After that, you can explore other knots and discover which style suits you best. Some people prefer simple and narrow. Others like fuller and more formal. There is no single perfect knot for everyone.
What matters most is that your tie looks neat, sits at the right length, and matches the occasion. Once you understand that, tying a tie stops feeling like a difficult task and starts feeling like a useful skill you can rely on anytime.
FAQs
- What is the fastest tie knot to learn?
The Four-in-Hand knot is the easiest and quickest to tie, making it perfect for busy mornings or last-minute events. - How can I tie a tie quickly without mistakes?
Practice a single knot repeatedly, move in a smooth rhythm, and keep the wide end under control. Confidence is key. - Can I prepare a tie in advance to save time?
Yes! Keeping your tie pre-selected and set at the right length can save a surprising amount of time during dressing. - Which events require fast tie tying?
Quick tie tying is useful for meetings, interviews, weddings, school functions, or any time you are in a hurry. - How do I avoid messy knots when tying fast?
Focus on simple, clean knots like the Four-in-Hand and don’t overthink every small detail — speed improves with practice. - Is it better to tie slowly or quickly for a good look?
A clean, simple knot tied quickly usually looks better than a slow, messy attempt. Smooth motion and confidence make a big difference. - Can beginners learn fast tie tying easily?
Absolutely! Even beginners can tie the Four-in-Hand knot quickly after a few practice attempts. - Does the article provide tips for tie length adjustment?
Yes, it advises setting your tie at the right length in advance to save time and avoid last-minute adjustments. - Why do people struggle with tying ties quickly?
Often, people overthink details and stop mid-process. Practicing one knot and maintaining a smooth rhythm helps overcome this. - What’s the main tip for quick tie tying?
Practice, confidence, and preparation — knowing one knot well and keeping your tie ready make tying fast and effortless.


Add comment