https://alamdiya.com/how-to-match-makeup-with-outfit/Shaping your eyebrows at home can feel difficult when you are unsure which hairs to remove or how much to trim. Taking away too much hair can make your brows look thinner than expected, while changing the arch can affect their natural appearance. Fortunately, you do not need professional skills or an expensive beauty kit to make your eyebrows look neat.
A beginner’s guide to eyebrow shaping should start with your natural brow shape, not with removing unwanted hair straight away. With a few basic tools, simple eyebrow mapping, and careful grooming, you can improve your brows without losing their natural fullness. This guide explains how to prepare your skin, find suitable reference points, remove stray hairs, trim long hairs, and create a polished look without plucking.
Understand Your Natural Eyebrow Shape
Before making any changes, look at how your eyebrows naturally grow. Some people have thick, straight brows, while others have a softer arch, thinner tails, or small gaps. These differences are normal and do not mean your eyebrows need a complete makeover.
Examine your brows in natural or evenly distributed light. Look at their thickness, the direction of hair growth, and the curve between the inner brow and the tail. Notice which hairs are part of the main shape and which grow separately around the edges.
Your eyebrows may not match each other perfectly. One might sit slightly higher, have a fuller arch, or grow differently near the tail. Instead of trying to make both brows identical, aim for a balanced appearance that works with your existing growth pattern.
Gather the Right Tools for At-Home Brow Shaping
You only need a few basic tools to begin shaping your eyebrows. Choose items that are easy to handle and give you good control over small areas.
- Slanted tweezers: Help you grip individual hairs when removing stray growth.
- Spoolie brush: Separates brow hairs and helps you see their natural direction.
- Small eyebrow scissors: Shorten unusually long hairs when trimming is necessary.
- Brow pencil: Marks mapping points and fills sparse areas after grooming.
- Mirror and good lighting: Make it easier to see fine hairs and compare both eyebrows.
- Clean tissues or cotton pads: Help you clean the skin and remove any pencil marks.
Check that your tools are clean before using them. Avoid working with scissors too close to your eyes, and never rush when handling sharp tools. Waxing is not essential for beginners, especially when your main goal is to make small, controlled changes at home.

Gather these essential tools to shape, trim, and groom your eyebrows carefully at home.
Use Eyebrow Mapping to Estimate Your Brow Shape
Eyebrow mapping helps you identify three reference points: the beginning of the brow, the approximate arch, and the tail. These points provide a simple outline to consider before removing any hair.
They are not strict measurements that every eyebrow must follow. Your natural growth, facial proportions, and preferred appearance should guide the final shape.
Find the Starting Point
Hold a brow pencil vertically beside the outer edge of your nostril to estimate where the inner brow begins. Look at the position of this point in relation to your other eyebrow and the space between your eyes.
Use the pencil to make a light mark if that helps. Do not remove hairs simply because they sit a little outside the mark. Some people naturally have brows that begin closer together or farther apart.
Estimate the Arch
Look straight ahead into the mirror and angle the pencil from the side of your nose toward the outer edge of your iris. The point where the pencil crosses the brow area can serve as a reference for the arch.
Your natural arch may sit somewhere different from this guide. Follow the curve your brow already has rather than removing hair to create a high or sharply angled arch.
Mark the Tail
Angle the pencil from the side of your nose toward the outer corner of your eye. Where it reaches the brow area can help you estimate the tail’s position.
Compare this point with your natural eyebrow length. Avoid shortening a tail just to fit the pencil guide, as the existing shape may suit your face better than a strict mapping line.
Once you have considered all three points, step back and look at your eyebrows together. Mapping should help you understand their shape before grooming, not encourage unnecessary hair removal.
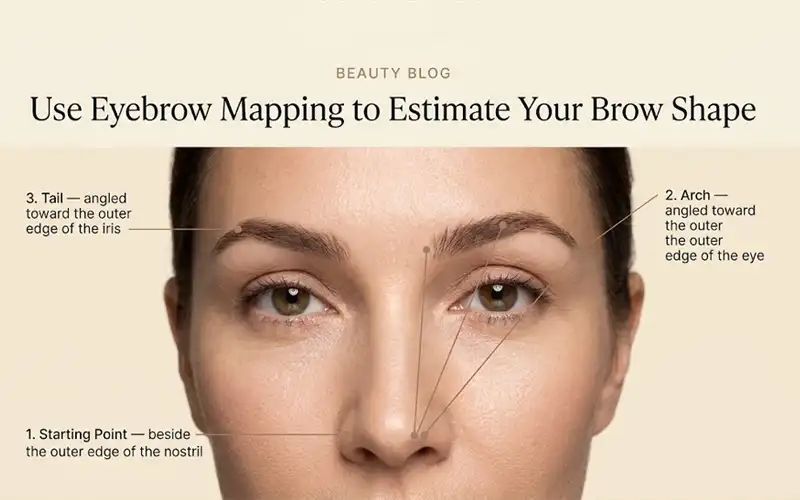
Use three reference points to estimate your eyebrow starting point, arch, and tail before grooming.
Prepare Your Skin Before Shaping
Preparing the brow area makes it easier to see individual hairs and work carefully. Begin with clean skin, removing any makeup, oil, or product residue around your eyebrows. Dry the area gently before using tweezers.
Brush your brow hairs into their usual position with a spoolie. If you want to use mapping points, mark them lightly with a brow pencil. Avoid drawing a thick outline because it can make you feel that every hair outside it needs to go.
Choose a comfortable place with enough light to see fine hairs clearly. Keep your tools within reach so you do not need to move around while working near your eyes.
If your skin is already irritated, broken, or particularly sensitive, postpone hair removal until it has settled. A simple grooming session should not leave your skin feeling painful or damaged.
Remove Stray Hairs Without Overplucking

Remove only noticeable stray hairs and follow your natural eyebrow shape for a neat, balanced look.
Tweezing works best when you use it to remove a few clearly unwanted hairs rather than redesign your entire brow. Start with the areas where individual hairs grow away from the main shape.
Step 1: Begin between the eyebrows.
Look for isolated hairs in the space between your brows. Remove only those you genuinely want to remove, keeping your natural starting points in mind. Do not widen the gap simply to create a sharply defined line.
Step 2: Tidy the lower edge.
Check underneath each eyebrow for obvious stray hairs. Grip one hair at a time with slanted tweezers and pull gently in the direction of its growth. Work slowly around the arch because removing several hairs there can change the curve noticeably.
Step 3: Be selective around the upper edge.
The upper outline contributes to your brow’s natural thickness and character. Leave most of this area untouched during your first session. Remove an individual hair only when it clearly sits apart from the shape you want to preserve.
Step 4: Check your progress.
After removing a few hairs, put the tweezers down and look at both eyebrows from a normal viewing distance. Close-up mirrors can make tiny differences appear more important than they really are.
Step 5: Stop before the shape becomes too thin.
If you are unsure whether a hair should be removed, leave it in place. You can review the shape another day in different lighting. Waiting gives you more flexibility than removing hair and then trying to recreate the missing fullness with makeup.
The goal is to make your brows look tidy while keeping their natural character. A small amount of grooming is often enough for a first attempt.
Trim Long Eyebrow Hairs Carefully
Tweezing and trimming solve different problems. Tweezers remove individual hairs from the root, while scissors shorten the length of existing hairs. Trimming is only necessary when some hairs extend noticeably beyond the surrounding shape.
Start by brushing the hairs upward with a spoolie. This reveals any tips that extend well beyond the natural upper edge. Avoid pulling the hairs tightly or stretching the skin while deciding what needs trimming.
Use small eyebrow scissors to shorten only the extra length. Make tiny cuts rather than cutting a straight line across the entire brow. Then brush the hairs back into their normal position and check the result.
If the hairs now sit neatly, stop. Cutting too much can leave uneven patches, make the brows look less full, or cause short hairs to stick out in different directions. When you are unsure, leaving the length untouched is a reasonable choice.
Shape Your Brows Without Plucking
You can make your eyebrows look more defined without removing any hair. This approach works well if you prefer a natural appearance, feel nervous about tweezing, or want to let previously overplucked brows grow.
Begin by brushing the hairs into place with a spoolie. Use gentle strokes to guide them along their natural direction rather than forcing them into a completely different shape.
If you have sparse areas, choose a brow pencil close to your natural hair colour. Draw short, light strokes that resemble individual hairs instead of filling the whole brow with one solid line. Blend the colour gently with a spoolie to soften any harsh edges.
Clear brow gel can help keep unruly hairs in place. Apply a small amount and brush the hairs in the direction you prefer. Avoid using too much product, as a heavy layer can leave the brows stiff or clumped together.
These methods improve the appearance of your eyebrows but do not remove hair or permanently change their shape. If your main concern is uneven colour or small gaps, makeup may be all you need.
Maintain Your Eyebrows and Care for the Skin
After tweezing, you may notice mild redness or temporary sensitivity around the brow area. A clean, cool compress can help soothe minor irritation. Avoid rubbing the skin or applying strong exfoliants and fragranced products while the area feels irritated.
Keep the skin clean and give it time to settle before using products that might cause further discomfort. If you develop worsening redness, significant swelling, increasing pain, or signs of infection, seek medical advice.
There is no single maintenance schedule that suits everyone. Some people notice stray hairs quickly, while others can leave their brows alone for longer. Check them when needed instead of removing hair every time you notice a new growth.
If you have overplucked your eyebrows, pause further hair removal and allow time for regrowth. Hair growth varies from person to person, and some hairs may take longer to return or may not grow back fully. A brow pencil or gel can help you manage sparse areas while you wait.
Frequently Asked Questions
How often should beginners shape their eyebrows?
There is no fixed schedule. Check your eyebrows when new stray hairs become noticeable and groom them only if necessary. Leaving enough time between sessions can help you avoid removing more hair than intended.
Can eyebrow hair grow back after overplucking?
Some overplucked hairs grow back, but the timing and amount of regrowth vary. Repeated damage to hair follicles can sometimes lead to lasting thinning. Avoid further plucking while waiting to see how your brows recover.
Is eyebrow mapping necessary for beginners?
No. Mapping can help you estimate the starting point, arch, and tail, but it is optional. You can also follow your natural brow outline and remove only a few obvious stray hairs.
What should I use if my eyebrows have small gaps?
A brow pencil or powder can help fill small gaps temporarily. Choose a colour close to your natural brows and apply it lightly so the result looks like hair rather than a solid block of colour.
Is trimming better than tweezing?
Neither method is automatically better. Tweezing is useful for removing individual stray hairs, while trimming shortens unusually long hairs. Choose the method that addresses the specific issue, and remember that you may not need either one.
6. Can I shape my eyebrows if they are naturally thin?
Yes. Brush your brows into place and follow their existing outline instead of removing more hair. A light brow pencil can help define the shape without making thin eyebrows look too harsh.
7. Should I shape my eyebrows before or after applying makeup?
It is usually easier to shape your eyebrows before applying makeup. Clean skin helps you see individual hairs clearly, while applying brow pencil or gel afterward allows you to define the finished shape.
8. How can I make my eyebrows look natural after shaping?
Keep the front of your brows soft, avoid drawing harsh outlines, and use light pencil strokes only where needed. Brush the hairs with a spoolie to blend the colour and soften any sharp edges.
Conclusion
Learning how to shape eyebrows at home is about understanding your natural growth and making small, careful changes. Start by examining your brows, use mapping points as flexible guides, and remove only the hairs that clearly sit outside the shape you want to maintain.
Trim only when necessary, use a pencil or gel if you prefer not to pluck, and give your eyebrows time to recover after excessive hair removal. Your brows do not need to match perfectly to look neat. A gentle approach that preserves their natural fullness is a practical starting point for beginners.
Also Read : How to Make Eyes Look Bigger With Makeup for Any Age and Eye Shape