Making your eyes look bigger with makeup is less about using more products and more about understanding placement, contrast, and your natural features. The right techniques can help your eyes appear more open, brighter, and well-defined without creating a heavy makeup look.
If you want to learn how to make eyes look bigger with makeup, this guide covers the preparation, a complete step-by-step tutorial, adjustments for different eye shapes, and tips for mature skin. You will also find simple options for people who prefer minimal makeup or want their eyes to look more awake without cosmetics.
Preparing the Eye Area Before Makeup
Dealing With Dark Circles and Uneven Skin Tone
Dark circles can create shadows beneath the eyes, sometimes making the eye area appear tired. If you want to cover them, choose a small amount of concealer that matches your skin tone or provides the correction you need. Blend it gently rather than spreading a thick layer across the entire under-eye area.
If the darkness has a strong blue, purple, or brown tone, a suitable color corrector may help before concealer. You do not need to use both products every day. Start with the least amount that gives you the coverage you want, and avoid rubbing the delicate skin around your eyes.
Creating a Comfortable Base for Eye Products
Before applying eye makeup, make sure the skin around your eyes is clean and comfortable. If your eyelids feel dry, use a suitable moisturizer sparingly and allow it to settle. Avoid products that cause irritation or leave the eyelids too slippery for makeup.
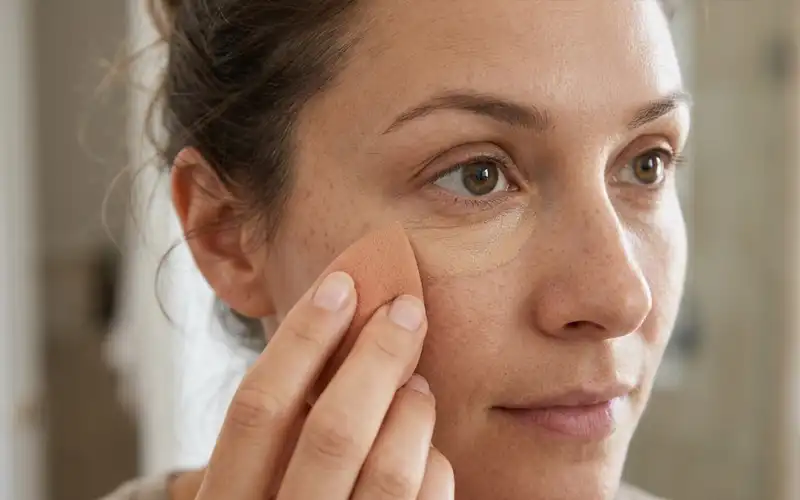
Apply a small amount of concealer and blend gently to even the under-eye area.
Step-by-Step Tutorial
This makeup tutorial brings the main techniques together in one routine. You can follow every step for a more defined look or leave out any product that does not suit your preferences. If you are learning how to make eyes look bigger with makeup, begin with a simple version and adjust it as you become more comfortable.
Step 1 – Prepare Your Eyelids With a Light Base
Apply a thin layer of eye primer or a small amount of suitable concealer if you want a more even starting point. Blend it over the area where you plan to place eyeshadow, keeping the layer light. If the product remains wet or sticky, give it time to settle before applying powder products.
Step 2 – Apply a Light Eyeshadow to Brighten the Lid
Choose a light shade such as soft beige, champagne, or a neutral color that complements your skin tone. Press or blend it across the visible eyelid using a small brush or your fingertip, depending on the product. The aim is to create a brighter-looking lid, not to cover the entire eye area with a very pale color.
Step 3 – Add Soft Crease Definition for Depth
Select a matte shade slightly deeper than your base color. Blend a small amount through the crease or just above it if that placement remains visible when your eyes are open. Use gentle movements and build the color gradually instead of applying a dark line that is difficult to soften.
Step 4 – Blend Eyeshadow Toward the Outer Corners
Use a clean blending brush to soften the edges of your eyeshadow and direct the color slightly outward. Keep the shape controlled so the shadow complements your natural eye rather than extending too far toward the temple. Check both eyes in a mirror while looking straight ahead to see how the placement appears in your normal expression.

Blend eyeshadow softly and keep eyeliner close to the upper lash roots.
Step 5 – Apply Thin Eyeliner Along the Upper Lash Line
Choose a pencil, gel, or liquid eyeliner that you can control comfortably. Apply it close to the roots of the upper lashes, keeping the line thinner where the eyelid space is limited. A narrow line defines the lashes without covering as much of the visible lid as heavy eyeliner can.
You can also try upper-waterline tightlining, which adds definition between the upper lash roots without creating a thick visible line on the eyelid. This technique is optional, and people with sensitive eyes or discomfort around the waterline should skip it.
Step 6 – Create a Small Upward Wing if It Suits Your Eye Shape
If you like winged eyeliner, extend the outer end of your line slightly upward rather than drawing a long, thick triangle. Keep the angle in harmony with your natural eye shape, especially if your outer corners turn downward. A wing is optional; a softly defined outer corner can also work well.
Step 7 – Add Nude Eyeliner to the Lower Waterline
If your eyes tolerate it, use a cosmetic pencil specifically labeled as suitable for the waterline in a soft beige or nude shade. This can reduce the contrast along the inner rim and create a more open-looking effect. White liner creates a more noticeable contrast and may look less natural on some people, so choose the finish you prefer.
Step 8 – Curl Your Upper Lashes Carefully
Place a clean eyelash curler near the roots of your upper lashes without pinching your skin. Close it gently for a few seconds, then release it before moving away from the eye. Never pull the curler or press too hard, and do not curl lashes after mascara has dried because they may stick to the tool or break.
Step 9 – Apply Mascara to Separate and Lift the Lashes
Move the mascara wand carefully from the lash roots toward the tips, using light strokes to coat the lashes. One or two thin coats may be enough; allow the first coat to settle before deciding whether you need another. Separate any clumps with a clean lash comb, and avoid getting product into your eyes.
For a more open look, you can emphasize the center lashes or focus slightly more on the outer lashes, depending on your preferred result. Center emphasis can preserve a rounded appearance, while extra definition at the outer lashes can create a more elongated effect.

Curl the upper lashes gently and apply mascara in thin, even coats.
Step 10 – Highlight the Inner Corners of Your Eyes
Apply a small amount of light eyeshadow or a subtle highlight to the inner corners near the tear ducts. A soft satin or fine shimmer finish can catch the light without looking overly glittery. You can also sweep a small amount of light, matte or satin eyeshadow just beneath the brow arch to highlight the brow bone and create a subtle lifted effect.
Keep both products away from the eyes themselves, and avoid using face products near the inner corners or brow bone unless they are suitable for those areas.
Step 11 – Brush and Shape Your Eyebrows
Brush your eyebrows into place with a clean spoolie or a suitable brow product. Fill only sparse areas if you want extra definition, using small strokes rather than drawing a solid shape. Keep the result balanced with your facial features instead of making the brows much darker or more angular than you prefer.
Step 12 – Check and Adjust Your Makeup With Your Eyes Open
Look straight ahead in natural or even lighting and check how the makeup appears when your eyes are open. If the crease color disappears, the eyeliner covers too much lid space, or one side looks heavier, make a small adjustment rather than adding more product everywhere. The finished look should feel comfortable, balanced, and suitable for your everyday expression.
Adapting the Finished Look to Different Eye Shapes
Adjustments for Hooded and Deep-Set Eyes
With hooded eyes, part of the eyelid may be covered by skin beneath the brow area. After completing your makeup, check the result with your eyes open because a placement that looks clear with closed eyes may become hidden when you look forward. Keeping visible lid space in mind can help you decide whether to make any small adjustments.
Deep-set eyes may naturally have more shadow around the socket, depending on bone structure and lighting. If you prefer a brighter appearance, avoid adding unnecessary darkness to areas that already look deeply shaded. You do not need to change your natural structure; the goal is simply to choose a finish that creates the balance you like.
Changes for Downturned and Almond-Shaped Eyes
Downturned eyes have outer corners that angle slightly downward, while almond-shaped eyes usually have a tapered outline. These shapes can look very different from person to person, so avoid relying on one universal eyeliner angle. When reviewing your finished look, consider whether the outer edges appear balanced with your natural features.
For downturned eyes, a softly lifted outer finish may be more suitable than extending the makeup downward. Almond-shaped eyes often provide flexibility with different styles, but the amount of visible lid space still matters. Make changes based on what you see in the mirror rather than assuming every eye within a category needs the same treatment.
Adjustments for Round Eyes
For round eyes, placing slightly more definition along the outer lashes can help create a more elongated appearance. If you prefer your eyes to look open and rounded, focus mascara on the center lashes instead. Keep eyeshadow placement balanced with your natural eye shape, and adjust the emphasis depending on whether you want a rounded or elongated finish.
Adjustments for Small and Monolid Eyes
For small eyes, heavy dark eyeliner around the entire eye can make the visible area appear smaller. A thinner line along the upper lashes may help keep more of the eyelid visible, while a light shade near the inner corner can create a brighter appearance. Choose the amount of definition based on your natural eye shape and the look you prefer.
Monolid eyes may have little or no visible crease, so traditional crease-placement techniques may not work in the same way. Apply eyeshadow where it remains visible when your eyes are open, and adjust the shade or blend it slightly higher if the color disappears when you look straight ahead. Since every eye shape is different, use these techniques as starting points rather than rules that everyone must follow.

Eye shape and visible lid space can influence where eyeshadow and eyeliner work best.
Choosing Makeup for Mature Skin and People Over 50
Considering Fine Lines and Changes in Eyelid Shape
People searching for how to make eyes look bigger with makeup over 50 may find that their usual products behave differently as their skin changes. Fine lines can cause some concealers or eyeshadows to collect in certain areas, while changes in eyelid shape can affect how much makeup remains visible. These are normal variations, not problems that everyone needs to correct.
Lightweight formulas and thin layers can be a practical starting point if heavy products feel uncomfortable or emphasize texture. Test products in the lighting where you usually wear your makeup, and judge them after they have settled. A matte finish, a soft satin finish, or a little shimmer may all work depending on your skin and personal taste.
Adjusting Product Amounts for a Comfortable Finish
When considering how to make eyes look bigger when older, focus on comfort and visibility rather than trying to look younger. You may prefer fewer layers, softer definition, or products that are easy to blend and remove. If your eyelids have become more hooded, use the open-eye check in the tutorial to see which details remain visible.
There is no single makeup style for everyone over 50. Some people enjoy bold eyeliner and bright colors, while others prefer a minimal finish. Choose products that suit your skin, avoid anything that causes irritation, and use the techniques that make you feel confident.
Making Your Eyes Look More Open Without Makeup
Grooming Your Brows and Lashes
If you want to know how to make your eyes look bigger without makeup, start with simple grooming. Brushing your eyebrows into place can make their natural shape clearer, while keeping the area tidy may help your features look more defined. Avoid excessive plucking or reshaping just to follow a trend, as your natural brow shape may already suit your face.
Lash grooming should also be gentle. Remove eye makeup fully before sleeping if you wear it, avoid pulling at lashes, and follow product instructions when using any lash-care treatment. These habits support the condition of your lashes and brows, although they will not change the actual size of your eyes.
Managing Temporary Puffiness and Tired-Looking Eyes
Temporary puffiness can make the eye area appear less open, especially after poor sleep, crying, or seasonal allergies. A clean, cool compress placed gently over closed eyes for a short period may help you feel more comfortable. Avoid applying ice directly to the skin or pressing hard around the eyes.
Getting adequate sleep and avoiding rubbing your eyes may also help reduce some temporary signs of tiredness. If swelling is persistent, painful, sudden, or affects your vision, seek medical advice instead of relying on beauty techniques. These measures can improve the appearance of temporary puffiness, but they do not enlarge the eyes themselves.

A clean, cool compress may help soothe temporary puffiness around the eyes.
Mistakes That Can Work Against Your Desired Look
Choosing Techniques Without Considering Your Eye Shape
A makeup trend may look attractive on someone else but produce a different result on your own features. Eye shape, lid space, skin texture, and personal style all influence how a technique looks. Use online examples for inspiration, not as instructions that must be copied exactly.
It is also worth remembering that photographs often use different lighting, angles, and editing. A look that appears dramatic on screen may be more subtle in person. Checking your makeup in natural lighting and making small adjustments can help you choose a result that works in everyday life.
Frequently Asked Questions
Does Nude Eyeliner Make Eyes Look Bigger?
Nude eyeliner can make the lower waterline appear less dark, creating the impression of a more open eye area. The effect varies with your natural coloring and the shade of pencil you choose. Use a product specifically designed for the waterline, and stop using it if it causes discomfort.
Can Mascara Alone Make Eyes Look Bigger?
Yes, curling your lashes and applying mascara can make your eyes appear more open without eyeshadow or eyeliner. Focus on separating the lashes and lifting them gently rather than applying several thick coats.
Which Eyeliner Placement Works Best for Hooded Eyes?
A thin line close to the upper lash roots can define the eyes while preserving visible lid space. Check the eyeliner with your eyes open and adjust its thickness to suit your natural eyelid shape.
Should You Apply Eyeliner to the Lower Lash Line?
You can, but a thick, dark line along the entire lower lash line may make some eyes appear smaller. If you prefer a more open look, try a softer shade along the outer portion and avoid applying it inside the waterline if it causes irritation.
Which Eyeshadow Colors Make Eyes Look Bigger?
Light and medium eyeshadow shades, such as beige, champagne, and soft brown, can help create a brighter, more defined look. Choose colors that complement your skin tone, and use a slightly deeper shade near the crease or outer corner for gentle definition. The best combination depends on your eye shape and the finish you prefer.
Can Dark Eyeshadow Make Your Eyes Look Smaller?
Dark eyeshadow can make eyes appear more defined, but applying too much across the entire eyelid may reduce the appearance of visible lid space. For a more open look, use darker shades selectively near the outer corners or crease and blend the edges softly. You can adjust the placement to suit your natural eye shape.
Conclusion
Learning to enhance your eyes is mainly about choosing suitable placement and adjusting it to your own features. A light lid shade, controlled eyeliner, lifted lashes, and a balanced finish can help create a more open appearance without requiring a large collection of products.
Start with the step-by-step tutorial, then adapt the routine to your eye shape, age, and preferred level of makeup. You do not need to follow every technique or change your natural features. The most useful approach is one that looks balanced, feels comfortable, and fits your everyday routine.
Also Read : How to Do Makeup for Small Eyes Without Making Them Look Smaller