



The first pump session might be bigger than you think. There are small parts on the counter, a bottle waiting under the flange, and no clear sign that anything is working yet. Learning how to use a breast pump starts with clean parts and a seal that does not rub. Keep suction gentle and write down one thing to try differently next time.
What to Expect in Your First Breast Pump Session
The bottle may look almost empty after your first pump. After all that setup, that can sting a little, but day one is not a milk test or a suction test. Little milk can happen when you are newly postpartum or pumping at a time your body does not expect it. Sleep and stress both shift output, and where you are in recovery adds another variable. One low-output session is a shaky way to judge supply or pump performance.
Trying to force an answer with stronger suction usually gives you sore skin before it gives you useful information. Look at what your body can tell you on day one instead. Did the nipple stay centered? Did the seal hold? Could you try again without dreading it? Sometimes the body needs a few tries before a machine feels familiar.
For the first session, keep the goals simple:
Learn the parts, so assembly is not a scramble later.
Find the correct flange position before suction starts.
Try low suction and notice what feels comfortable.
Stop early enough that your skin and nipples are not irritated.
Note One Change to Try Next Time
If the nipple stayed centered, the seal did not slip, and nothing hurt, session two starts from a better place.
How to Clean and Assemble a Breast Pump Before First Use
Breast pump first-time use starts before the flange ever touches your skin. Try not to open the box five minutes before you need to pump. The CDC treats breast milk residue on pump parts as a hygiene risk, so wash, rinse, and air dry every milk-contact piece before session one.
Read the manual and sort the parts. Put flanges, collection containers, valves, and diaphragms in the wash group. Motor pieces stay dry.
Clean or sterilize as directed. Wash every part that touches milk before first use. The CDC also recommends sanitizing first when a baby is younger than 2 months, was born prematurely, or has a weakened immune system.
Air dry each piece. Lay parts on a clean towel or rack until fully dry, and skip rubbing them with a dish towel. Damp silicone behaves differently, and water near a valve can weaken suction.
Assemble only when dry. Seat the valve flat and check the diaphragm sits evenly. A slight fold or gap is enough to make suction feel weak on the first run.
Check each connection by hand. Feel how each part clicks or threads into place so assembly is not a guess under pressure later.
If the part names start to blur during setup, eufy breast pumps lists models with their flange sizes and replacement part details, so you do not have to sort the same kit twice.
How to Fit the Flange and Check the Seal Before Pumping
If the first session hurts, the flange is often where the problem starts. Before the motor comes on, place the nipple in the center of the tunnel and check the angle. It should face forward rather than tilt up, down, or sideways. Once suction begins, even a small rub against the tunnel wall can bother your skin before the session is halfway done.
The angle is not always easy to see from above. A mirror or phone camera helps. After the nipple looks centered, run one last check around the rim and make sure no bra fabric or clothing is folded under the seal.
For a basic size check, measure the nipple itself, not the areola. Use a paper ruler, printable guide, or pump sizing card, and measure across the nipple base before pumping. Many people start with an insert about 1 to 3 mm larger than that number, then judge by comfort. The nipple should move without scraping the tunnel. Too much areola pulled in can mean the tunnel is too large. Pinching, whitening, or wedging can mean it is too small or angled wrong.
| What you notice | What it may mean | First adjustment |
| Nipple rubs one side | Flange is off-center or too small | Pause and realign before continuing |
| Too much areola pulls in | Flange may be too large | Try a smaller insert if available |
| Suction feels weak | Seal or valve may not be seated | Check rim, valve, and diaphragm |
| Pinching starts fast | Suction, angle, or size may be wrong | Stop and lower intensity or resize |
When fit checks point to a different insert, valve, or diaphragm, check eufy breast pump accessories for parts that match your pump.
Stop for sharp pain, bleeding, or broken skin. An IBCLC or your healthcare team can confirm sizing and identify problems a flange tweak alone will not fix.
Why High Suction Backfires and When to Stop Session One
Once the flange feels seated, it can be tempting to max out suction or keep going when milk is slow. First-session soreness often comes from suction that climbed too fast, long before session length becomes the problem.
Why High Suction Can Backfire
If pain is the first thing you feel, start lower. If pumping feels wrong, check flange fit, cycle rhythm, and suction together rather than adjusting one setting at a time. An IBCLC can help review those basics if pain keeps coming back. High suction can irritate nipple or breast tissue without moving more milk. If the pump has a stimulation or massage mode, start there, then raise suction only until you feel a steady pull.
When output lags, we might instinctively raise suction and watch the bottle, but that can tighten the upper body and slow letdown even when flange fit is fine. High suction does not reliably move more milk.
When to Stop Pumping
Ten to fifteen minutes is enough for many first tries. Your body has not learned this pump yet. Stop when suction starts to sting, your skin feels irritated, or you simply feel done, with or without milk in the bottle. Leave enough comfort for attempt two.
A few habits tend to make the first try harder than it needs to be: continuing through sharp pain or visible irritation, changing every setting at once when output is low, and extending the session after comfort drops.
Soreness that starts within the first few minutes is a signal to stop, not a cue to turn suction up. Check flange size, placement, and suction before you pump again. Stop for sharp pain, bruising, or broken skin, even if the session feels unfinished.
When to Use Heat and Massage Features on a Breast Pump
Heat, massage, and small comfort tweaks belong after flange fit, and suction feels tolerable. A wrong angle or pain from the first minute will not be fixed by warmth, a covered bottle, or a quieter chair.
Use warmth when the session feels tight but not painful. Maybe your shoulders are up, the room is cool, or let-down feels slow even though the flange is centered. Massage can give the session a rhythm that feels less like raw pulling.
Keep the first use of these features simple. Start with mild heat and increase only if it feels soothing. Keep suction low while you test warmth or massage, and stop if comfort gets worse. Heat and massage should not cover up pain.
For wearable breast pump setup on attempts one and two, the eufy Wearable Breast Pump S2 Pro is one hands-free example to compare with your fit needs. In a dim room, the see-through tunnel and built-in nipple light make it easier to center the flange without bright overhead light or another clothing adjustment. After suction already feels tolerable, HeatFlow™ 2.0 adds 360° wrap-around warmth with seven adjustable levels, warming in about 15 seconds, while VibraPump™ massage runs during the session. These features work best when the session already feels manageable, not as a way to push harder for let-down.
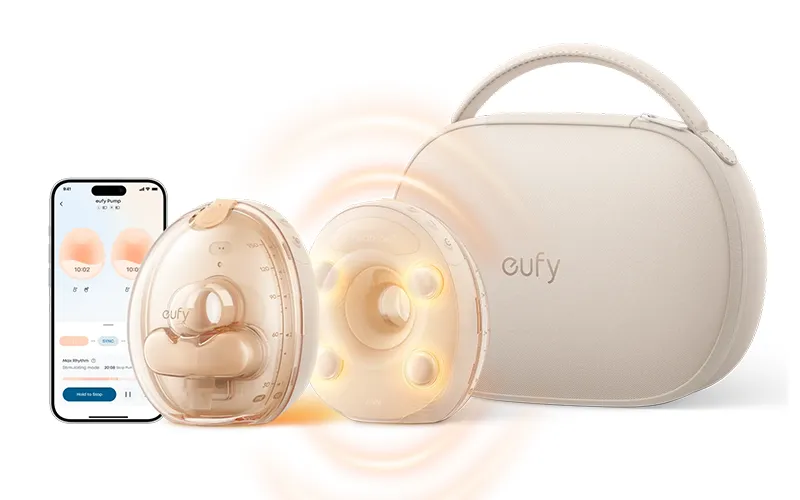
how to use a breast pump for the first time
How to Adjust After Your First Pumping Session
Look at your skin and the parts before anything goes in the sink, then note what to change next time.
What to Check and Record After Pumping
Before you wash parts, look at your skin and the seal marks left behind. A light ring from the flange can fade within an hour. Rawness, deep grooves, bruising, or sharp nipple pain means something in the setup needs to change before session two. If suction felt weak near the end, pop the valve and diaphragm out once and check whether either piece shifted.
Write it down on your phone before you wash up. Write down the flange or insert, the level and mode, and how long you ran. If you quit early, say why. Note a loose rim, weak pull, or odd rattle if one showed up.
If you collected milk, label the bottle with the date and time before it gets mixed into the rest of the day. CDC storage guidance says freshly expressed milk can stay at room temperature, 77 F or colder, for up to 4 hours, but refrigerating it sooner is the safer habit when you are not feeding right away.
Before the next session, check your notes and start with what felt worse. If you do not repeat the same setup, note that while it is still clear.
What to Change Next Time
Pick one fix before you pump again.
If pumping hurts, lower the suction or recheck the flange size. When the suction feels weak, remove the valve and diaphragm and reseat the rim. For easier alignment, try using a mirror or brighter light before the next session. If watching the bottle makes you anxious, cover it or set a short timer.
Fix one thing at a time, even when it feels slow. Your skin gets a better chance to settle, and the next session is less intimidating. If you are unsure how often to pump, ask an IBCLC or healthcare team to plan around your baby’s feeds and where you are in recovery.
Conclusion
The first session does not have to go perfectly. Wash the parts, center the flange, and keep suction comfortable. Stop before skin irritates. Label any milk you collect with the date and time. If sharp pain, broken skin, or recurring clogs continue after fit adjustments, an IBCLC can catch what a flange swap alone will not.
FAQs
1. How do you use a breast pump for the first time?
Start by washing and drying the pump parts. Place the flange over the nipple, start with low suction, and slowly increase it only if it feels comfortable.
2. How long should you pump the first time?
For the first session, around 10 to 15 minutes can be enough. Stop earlier if you feel pain or irritation.
3. What suction level should I use on a breast pump?
Start with a low suction level. You can slowly increase it until you feel a comfortable pulling sensation. Stronger suction does not always mean more milk.
4. Why does pumping hurt my nipples?
Pain can happen when the flange is the wrong size, the nipple is not centered, or the suction is too strong. Stop and check the fit before continuing.
5. How do I know if my breast pump flange fits correctly?
The nipple should stay centered and move freely inside the tunnel. It should not rub against the sides or pull in too much of the surrounding skin.
6. How much milk should I get the first time I pump?
The amount can be different for every mother. Getting only a small amount during the first session does not always mean there is a problem with milk supply.
7. How should I clean a breast pump after using it?
Wash the parts that touch breast milk with soap and water, rinse them well, and let them air dry completely. Follow the pump manufacturer’s cleaning instructions.
8. What should I do if my breast pump is not getting much milk?
First, check the flange position, suction level, valve, and diaphragm. Try to stay relaxed and comfortable. If low output continues, speak with a healthcare professional or lactation consultant.